Overview
A robust NoSQL database, MongoDB is renowned for its adaptability and scalability. By distributing data among several servers, a MongoDB cluster allows for high availability and horizontal scaling. This blog post will walk you through the process of configuring a Linux MongoDB replica set cluster.
One of the most widely used NoSQL databases, MongoDB is well-known for its scalability, flexibility, and capacity to manage massive data sets. When high availability and scalability are required, as in financial systems, gaming applications, or e-commerce platforms, a MongoDB cluster is essential. With thorough, simple-to-follow instructions and examples from real-world situations, this blog will assist you in setting up a MongoDB cluster on Linux.
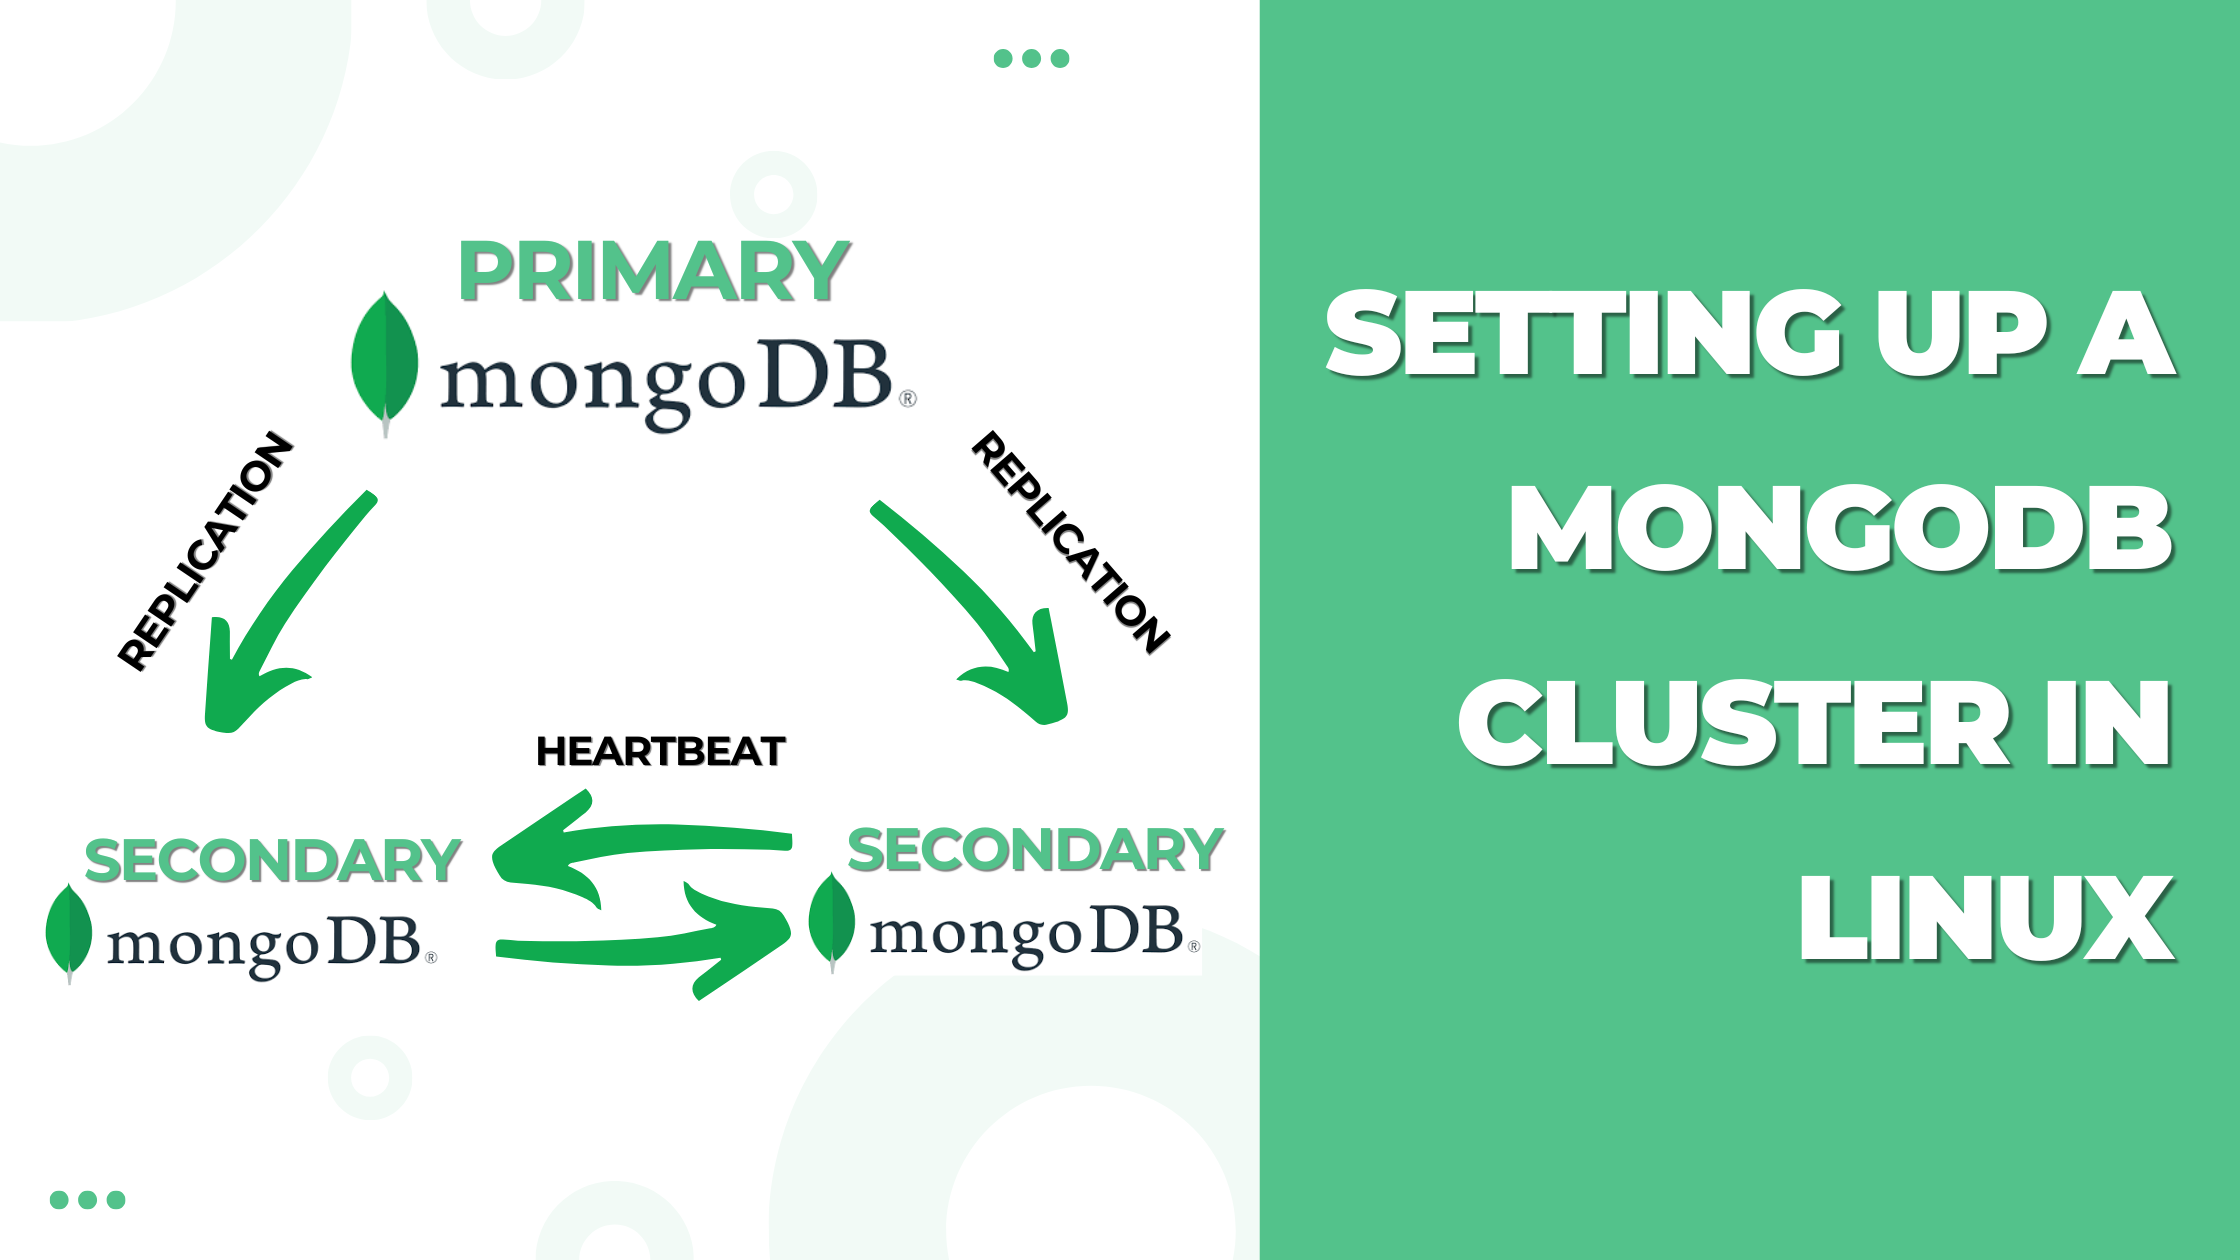
Imagine running an online store like Amazon. Millions of users are concurrently browsing products, adding items to baskets, and placing orders during periods of peak sales. A single database server can’t handle such a massive workload efficiently. This is where a MongoDB cluster comes into play.
- Horizontal Scaling: By distributing the data among several servers, horizontal scaling makes sure that even with high traffic volumes, everything runs well and smoothly.
- High Availability: Replica sets ensure that your application continues to function even in the event of a server failure.
Let’s now begin configuring a Linux MongoDB replica set cluster!
Prerequisites:
- Spin up 3 Virtual Machines in any cloud provider of your choice.
You need three Linux servers to form the cluster. We’ll call them:
- mongo-1 (Primary Node)
- mongo-2 (Secondary Node)
- mongo-3 (Secondary Node)
2. Also Enable Networking Between Nodes: Ensure all servers can communicate with each other over the network. Open the MongoDB port (27017) in your firewall/NSG Rules.
To check if the connectivity is successfully established, use the below command from any of the servers:
telnet <MONGO-IP> 27017
Step 1: Install MongoDB on All Servers
Use the following commands on each server:
sudo apt-get -y install gnupg

sudo wget https://repo.percona.com/apt/percona-release_latest.$(lsb_release -sc)_all.deb

 dpkg -i percona-release_latest.$(lsb_release -sc)_all.deb

 sudo apt update && sudo percona-release enable psmdb-44 release && sudo apt update

 sudo apt -y -o Dpkg::Options::="--force-confdef" -o Dpkg::Options::="--force-confold" install percona-server-mongodb=4.4.22-21.focal

 sudo systemctl daemon-reload && sudo systemctl enable mongod

 sudo systemctl start mongod
These commands can be found in the Official MongoDB Documentation as well.
Step 2: Configure MongoDB for Replication
MongoDB requires some adjustments to support clustering.
Edit MongoDB Configuration On Each Server:
- Open the MongoDB configuration file:
sudo nano /etc/mongod.conf- Bind IP to allow cluster communication:
net:
bindIp: 127.0.0.1,<server_ip>- Enable replica set:
replication:
  replSetName: "mongo-rs"
Restart MongoDB
sudo systemctl restart mongod.Step 3: Initialize the Replica Set
Once all the servers are configured, it’s time to form the cluster now.
SSH into each VM and Connect to MongoDB Shell.
mongo- Initialize the Replica Set: Run the following command on the primary node:
rs.initiate({
_id: "mongo-rs",
members: [
{ _id: 0, host: "mongo-1:27017" },
{ _id: 1, host: "mongo-2:27017" },
{ _id: 2, host: "mongo-3:27017" }
]
});
This tells MongoDB that these three servers are part of the replica set.
- Verify the Configuration
rs.status();If everything is set up correctly, you’ll see that one node is the primary, and the others are secondaries.
Step 4: Test the Cluster
Check Replica Set Status On any node, connect to the MongoDB shell and run:rs.status()
- Look for the “stateStr” field in the output:
- PRIMARY: Node handling read/write operations.
- SECONDARY: Nodes replicating data from the primary.
Test Failover Stop the primary node:
sudo systemctl stop mongodCheck if one of the secondary nodes becomes the primary.
Step 6: Adding Authentication (Optional but Recommended)
Enable Security in MongoDB Config File:
security:

  authorization: enabled
Create an Admin User:
use admin;
db.createUser({
  user: "admin",
  pwd: "securepassword",
  roles: [ { role: "root", db: "admin" } ]
});
Restart MongoDB Services:
sudo systemctl restart mongodConnect to MongoDB with Authentication:
mongo -u admin -p <PASSWORD> --authenticationDatabase adminConclusion
Well done! You have successfully installed a MongoDB cluster on Linux. In addition to offering high availability and resilient to failures, this configuration guarantees that your application can manage unforeseen outages and increasing data needs. A MongoDB cluster is a dependable option for contemporary data solutions, regardless of whether you’re operating a business system or developing a startup.
Check out the official MongoDB documentation for additional details.
Cheers to clustering !!
Please share this article if you found it helpful.
👍 Please share this article if you found it helpful.
Please feel free to share your ideas for improvement with us in the Comment Section.
🤞 Stay tuned for future posts.
Feel free to contact us for more conversations regarding Cloud Computing, DevOps, etc.
🚩 Our Recent Posts
- What is Grafana? How to Install and Set Up Grafana for Effective Data Visualization?
- Monitor your MongoDB using Mongo Exporter in Prometheus | in simple steps
- How to Monitor your Kubernetes Cluster using Prometheus Easily – Beginners Guide
- How to setup and monitor Endpoints using Blackbox Exporter in Prometheus using simple Steps?
- How to setup a monitoring for TCP Endpoints using Blackbox Exporter in easy steps?
- How to Set Up Federate Jobs in Prometheus: A Simple Guide to Understanding Federate Jobs
- What is Prometheus? How to setup a Prometheus in easy steps?
- How to setup Node Exporter and Easily use it to monitor your Virtual Machine?
- How to monitor your SQL Databases using Prometheus in simple steps?
I’m a DevOps Engineer with 3 years of experience, passionate about building scalable and automated infrastructure. I write about Kubernetes, cloud automation, cost optimization, and DevOps tooling, aiming to simplify complex concepts with real-world insights. Outside of work, I enjoy exploring new DevOps tools, reading tech blogs, and play badminton.
Subscribe to our Newsletter
Please susbscribe


